Skip to content

Carl's Place DIY Golf Enclosure Kit with Impact Screen

$1,149.95
Sim room zoneHitting bayThe bay, screen and nets you hit into.

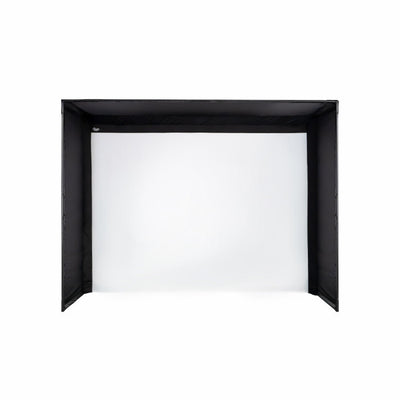
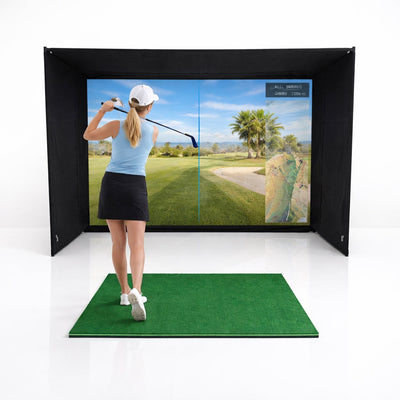
The impact screen runs all the way to the floor, so the picture meets your turf with no gap.

  • Floor-length impact screen
  • BlackStop enclosure
  • Fittings included, pipe separate
  • 4 screen materials
  • Free shipping on orders $1,000+ to the lower 48. Smaller orders ship from $7.95.
  • Carl's Place partner dealer. New stock with the full manufacturer warranty.
  • Free room check before you buy. Enter your room size and I'll tell you if it fits.
  • Questions? Call or text (931) 278-5630. You get me, not a call center.
SCREEN MATERIAL
ENCLOSURE SIZE

Get that seamless floor-to-turf look while you practice at home.

The Carl's Place DIY Golf Simulator Enclosure Kit is built to bring the real feel of golf right into your space. You get the impact screen (the kind that lets the image run all the way to the floor), the tough BlackStop™ enclosure, and the fittings to build your frame. And you're not left guessing on the pipe — Carl's tells you exactly what to grab, or you can make it dead simple with their Pipe Framing Kit for an all-in-one setup.

The Details

Picture walking into that spare room whenever you want and working on your swing — January, July, doesn't matter. This is what makes year-round golf at home actually doable.

To get the most out of it, pair the enclosure with a solid launch monitor. That's where the magic happens — you start seeing the real story behind every swing: ball flight, spin, ball speed, and more. Those numbers are what turn "hitting balls" into actually getting better.

Your Choice of Impact Screen

The screen material comes in four versions — Standard, Preferred, Premium, and the new High-Contrast Gray Premium. Every one of them is engineered with a bottomless edge, so you get that clean floor-to-turf image with minimal bounceback.

BlackStop™ Enclosure

The BlackStop™ surround wraps your simulator in a tough, light-shading surface — which does two things. It shades the screen so your image looks its brightest, and it catches the shots that miss or bounce back. Because nobody wants a wall full of golf-ball-sized dents.

Steel Fittings

The kit includes the corner fittings to connect your frame together. (Pipes sold separately — Carl's tells you exactly what you need.)

Zip Ties — and Yeah, We Thought of Tension

You get all the fasteners to secure the enclosure and screen, including zip ties to attach the screen to the frame. They even throw in extras so you can dial in the right tension for your swing. Depending on how close you hit to the screen, your ball speed, your clubs, and your spin, you can adjust it all to find that sweet spot between tension and slack. Little detail, big difference.

Made to Order — Built for Your Room

Here's the best part: these enclosures are made to order, sized to fit your space. Sounds like that'd take forever — it doesn't. Carl's does it well and does it fast, and you'll see your delivery date right in the cart before you buy.

Need a Custom Size?

Got an odd space? Screens and enclosures can be customized down to the inch, so you get a setup that fits your room exactly. 

The details

What you're getting

Specs

Installation

The standard DIY kit requires separately sourced 1-inch EMT frame pipes, unless a Pipe Framing Kit is included. Use the manufacturer cut list for the exact enclosure size selected. 1-inch EMT is a trade size; the manufacturer specifies a 1.163-inch outer diameter.

Specs checked against the manufacturer's published specs on Oct 30, 2026.shop.carlofet.com

What's in the box

Selected impact screen, BlackStop enclosure, steel corner fittings and zip ties. Frame pipes are sold separately unless a Pipe Framing Kit add-on is explicitly included in the selected offer.

Not sure what else you need to finish the room? Call or text (931) 278-5630.

Description

Get that seamless floor-to-turf look while you practice at home.

The Carl's Place DIY Golf Simulator Enclosure Kit is built to bring the real feel of golf right into your space. You get the impact screen (the kind that lets the image run all the way to the floor), the tough BlackStop™ enclosure, and the fittings to build your frame. And you're not left guessing on the pipe — Carl's tells you exactly what to grab, or you can make it dead simple with their Pipe Framing Kit for an all-in-one setup.

The Details

Picture walking into that spare room whenever you want and working on your swing — January, July, doesn't matter. This is what makes year-round golf at home actually doable.

To get the most out of it, pair the enclosure with a solid launch monitor. That's where the magic happens — you start seeing the real story behind every swing: ball flight, spin, ball speed, and more. Those numbers are what turn "hitting balls" into actually getting better.

Your Choice of Impact Screen

The screen material comes in four versions — Standard, Preferred, Premium, and the new High-Contrast Gray Premium. Every one of them is engineered with a bottomless edge, so you get that clean floor-to-turf image with minimal bounceback.

BlackStop™ Enclosure

The BlackStop™ surround wraps your simulator in a tough, light-shading surface — which does two things. It shades the screen so your image looks its brightest, and it catches the shots that miss or bounce back. Because nobody wants a wall full of golf-ball-sized dents.

Steel Fittings

The kit includes the corner fittings to connect your frame together. (Pipes sold separately — Carl's tells you exactly what you need.)

Zip Ties — and Yeah, We Thought of Tension

You get all the fasteners to secure the enclosure and screen, including zip ties to attach the screen to the frame. They even throw in extras so you can dial in the right tension for your swing. Depending on how close you hit to the screen, your ball speed, your clubs, and your spin, you can adjust it all to find that sweet spot between tension and slack. Little detail, big difference.

Made to Order — Built for Your Room

Here's the best part: these enclosures are made to order, sized to fit your space. Sounds like that'd take forever — it doesn't. Carl's does it well and does it fast, and you'll see your delivery date right in the cart before you buy.

Need a Custom Size?

Got an odd space? Screens and enclosures can be customized down to the inch, so you get a setup that fits your room exactly. 

FAQ

How far away should I stand from my impact screen?

For the safety of both the golfer and the screen, we recommend standing a minimum of 10-12 feet away from the screen.

Can I iron or steam a golf impact screen?

We do NOT recommend ironing your golf screen, simply because it is very easy to damage the screen. And we want your golf screen to last you a long, long time. With wrinkles and fold marks, the best thing is prevention. Unpack your new screen immediately, and if you need to store it, fold it very loosely. But if you're reading a section on ironing your golf screen, it's probably too late for prevention. Know that mounting your golf screen to a frame with tension, like with our zip ties or ball bungees, and letting it relax for a couple of days will smooth out most wrinkles.

That being said...

We have also had success using a steamer to help get wrinkles and folds out. Using a clean, consumer-grade steamer with distilled water will help accelerate the wrinkle removing process, and should avoid leaving water marks on your screen.

Can I wash my golf screen material?

Check out this article for all our recommendations on 'How to Clean Your Golf Impact Screen'.

Are there safety concerns when using a golf simulator?

We want your indoor golf set up to be fun, help improve your game, and be safe for everyone.

  • Make sure to follow the assembly manual provided with your enclosure.
  • Keep children, pets, and spectators out of swing range.
  • Protect ceilings, walls, windows, cars & neighboring homes.
  • Understand the Terms of Sale of using a Carl's Place product.

Do I need to use a golf hitting mat?

Golf hitting mats give you a nice cushy surface to stand and swing your golf club. They help protect your joints from any impact during your swing. They also let you have a more realistic golf practice when you can tee up the golf ball at the perfect height and swing freely.

When choosing a size for your golf mat consider the golfer's needs. A size of 4'x5' will let most golfers swing a driver with their heels comfortably on the edge of the mat. A larger size, 5'x7' or 4'x9', would be able to accommodate golfers with a wide stance or if you have friends over swinging either rightie or leftie.

Shop golf mats.


Golf Enclosure Information

What is the difference between Carl's Enclosure Kits?

Carl's DIY Golf Enclosure Kit offers you an easy, entry-level way to build a safe place to swing your clubs. An affordable, convenient kit, the DIY Enclosure Kit helps home golfers take the guesswork out of designing their own golf simulator.

Carl's Pro Golf Enclosure Kit is a higher-end enclosure for top-of-the-line performance in a golf simulator. Because it's available in wider, deeper bays with additional safety features it makes the best commercial golf simulator enclosure.

Carl's Curved Golf Enclosure Kit takes the Pro Enclosure’s sturdy design to the next level, adding a seamless curved screen for a truly immersive experience. Its unique structure surrounds the golfer, creating a lifelike, panoramic view that’s as impressive as it is functional.

Not sure which one is for you? Check out this article 'DIY vs. Pro' to help you decide.

How much space do I need for the enclosure?

When measuring for a golf simulator, make sure you take into account:

  • Buffer space: You don't want your golf simulator right up next to any walls or ceiling. Balls that contact the walls or ceiling can cause damage and have unwanted bounce back.
  • Footprint of the golf enclosure: Make sure to check the actual dimensions of the enclosure footprint. Our C-Series enclosures have built-in buffer space in the rear with the backset rear fitting.
  • Safe golfing distance away from the screen: For the safety of both the golfer and the screen, we recommend standing a minimum distance of 10 to 12 feet away from the screen.
  • Height of the golfer(s)
  • Length of the golf club(s)
  • Turf thickness, heating ducts, and soffits
  • Furniture and access to doorways
For complete guidelines on proper spacing for a golf simulator, check out our article 'Measuring Your Space for an Indoor Golf Simulator'.


When will my enclosure ship?

Our golf enclosure kits are made to order (which is why we can customize them down to the inch!). We make sure they are measured, sewn, and packed perfectly before they are ready to ship. Because of that, production lead time may fluctuate based on volume. To see the expected shipping and delivery times, please add the item to your cart and enter your shipping information.

What if the black enclosure material gets hit with a golf ball?

The enclosure material is not designed to take a direct hit from a golf ball. However, if you hit the white impact screen, and it bounces and hits the enclosure, you should not experience any issues.

Can I get a replacement screen for the enclosure?

We can easily make you a replacement screen to save you money. Replacement screens can be ordered by contacting one of our Customer Service Team Members. You can also call us at 608-352-0002. Learn more information about extending the life of your golf screen.

You can also check out our Clearance section to see if you can snag a deal on a replacement golf screen that fits your setup.

Installation

What pipes do I need to construct the enclosure kit frame?

Our DIY Golf Simulator Enclosures require 1-inch EMT (Electrical Metal Tubing/Conduit). We recommend you add a Pipe Framing Kit to your order so you get pre-cut, perfectly sized pipes for your enclosure frame. However, you can source EMT pipes on your own. Your kit will include all details on what lengths and quantities of pipes are required.

How long does it take to assemble the enclosure?

DIY Golf Simulator Enclosure Kits assemble in about an hour, depending on the size. Of course, it goes a bit faster if you have a helper. Here's our assembly video and manual for reference.

What are EMT pipes?

EMT stands for Electrical Metal Tubing, also known as, Electrical Metal Conduit. We often just refer to them as pipes on our website. You need EMT  (pipes) to build the frame for your enclosure/screen. Do not mistake PVC pipes for EMT. PVC will not work with our fittings. You have 2 options on how to get the necessary pipes:

  1. Add a Pipe Framing Kit. (You'll see these as accessories on our DIY and Pro Golf Enclosure Kits.
  2. Source EMT pipes at your local building supply store.
    • DIY Enclosures require 1″ EMT.
    • Pro and Curved Enclosures require 2" EMT which can be more difficult to find. Make sure you have a source for your EMT when selecting whether you want to add on our Pipe Framing Kit options.

Where and how should I mount my projector?

The projector specifications determine the maximum image size and how far from the screen it will need to be mounted. Check out our screen size calculator to find the best mounting location.

As for how to mount your projector, here are the places to put a golf simulator projector.

  1. Mount a projector above your tee or mat. 
    • Flush-mount to your ceiling in spaces with lower ceilings
    • Drop-mount from your ceiling in spaces with higher ceilings
    • Frame-mount from your Carl's Place Pro Enclosure
  2. Place a short-throw projector on the floor inside the golf simulator.  Of course, if you floor-mount your projector you must build or buy a protective cover to keep it safe from golf balls and clubs.

Read more here about projector mounting options.

Custom Options

Can you make a custom size golf simulator enclosure?

Yes! Head over to Build Your Own Golf Simulator where you can choose the size of enclosure and screen that fits your space. Please make sure to review our Returns Policy for custom products.

Resources

Assembly instructions and standard-size diagrams for the Carl's Place DIY C-Series golf simulator enclosure kit. Download them before you order so you can check the frame against your room.

Carl's Place DIY C-Series enclosure kit

Standard size diagrams

Tap a diagram to open it full size.

7.7x10x5 DIY enclosure

Carl's Place DIY C-Series enclosure diagram, 7.7x10x5 size

7.7x13x5 DIY enclosure

Carl's Place DIY C-Series enclosure diagram, 7.7x13x5 size

8.5x11.5x5 DIY enclosure

Carl's Place DIY C-Series enclosure diagram, 8.5x11.5x5 size

8x10.5x5 DIY enclosure

Carl's Place DIY C-Series enclosure diagram, 8x10.5x5 size

8x8x5 DIY enclosure

Carl's Place DIY C-Series enclosure diagram, 8x8x5 size

9x12x5 DIY enclosure

Carl's Place DIY C-Series enclosure diagram, 9x12x5 size

Ready to order, or not sure which size fits?

Shop Carl's Place enclosures or browse all enclosures & bays. If you're not sure which size fits, send me your ceiling height, width and depth or call or text (931) 278-5630.

Thanks for choosing Cornerstone Golf. I'm one person who loves this stuff and wants to help you do it right — whether you build it yourself or have me install it here in Middle Tennessee. Every product I carry is chosen because it works, and if you're ever unsure, just reach out. I'd rather help you find what fits than sell you what doesn't. Let's talk.

Before you buy

Big purchase. Here's how to make sure it's the right one.

Will it fit your room?

Enter your room size. I'll check it against this product and reply with a straight answer, even if the answer is no.

Rather send a photo? Text it to (931) 278-5630

Know before you buy

Returns
Return terms are set by the manufacturer. Ask me before you order and I'll tell you exactly what applies.
Warranty
Covered by the manufacturer's warranty. Ask me for the exact terms.
Shipping
Tracking is emailed when it ships.
Bought through
Carl's Place partner dealer

Refund policy · Shipping policy

Compare with similar options

You're viewing
Carl's Place DIY Golf Enclosure Kit with Impact Screen

Carl's Place

Carl's Place DIY Golf Enclosure Kit with Impact Screen

$999.95

  • Floor-length impact screen
  • BlackStop enclosure
  • Fittings included, pipe separate
  • 4 screen materials
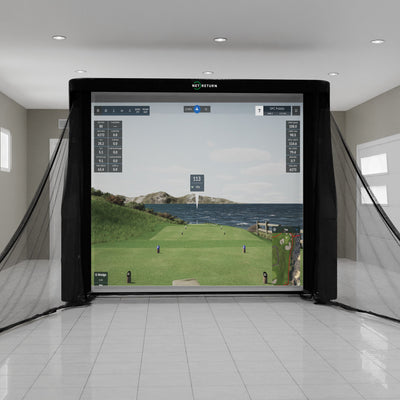
Golf simulator setup in a room with a large screen displaying a golf course.

The Net Return

The Net Return Simulator Bay 8

$1,395.00

View

Finish the rest of your sim room

You're shopping the Hitting bay. Here's one pick for each of the other zones in the room.

Or pick every piece at once in the Sim Builder

Questions I get asked a lot

How much space do I need for a golf simulator enclosure?
For a 10 ft wide bay, plan on about 12 ft wide, 9 ft tall and 14 ft deep. An 8 ft bay can work in a room around 10 ft wide. If you're tall or swing a long driver, plan on closer to 10 ft of ceiling.
Does a golf simulator enclosure come with a screen?
Most do, but check "What's in the box" on each listing. The Net Return Simulator Bays and the Carl's Place DIY kit both include an impact screen.
Can I put a golf simulator enclosure in my garage?
Yes, as long as your ceiling clears your swing and you can work around the garage door track. Still need to park in there? Look at a retractable screen. It rolls up out of the way when you're done.
Is an enclosure the same as a full golf simulator?
No. The enclosure is the bay you hit into. To play, you also need a launch monitor, a hitting mat, a projector or TV, and software. The Sim Builder lets you pick all of it at once.

Still have a question? Call or text (931) 278-5630.

Why buy it here

A real person on the other end.

You get me, not a call center

One phone number, and I answer it. Ask whether this works with your setup before you order.

I build these rooms

Ten years in construction. The advice comes from framing these rooms, not from reading a spec sheet.

Install near Clarksville

Licensed and insured, about 90 minutes around Clarksville, TN. Everything else ships anywhere in the US.

Description

Get that seamless floor-to-turf look while you practice at home.

The Carl's Place DIY Golf Simulator Enclosure Kit is built to bring the real feel of golf right into your space. You get the impact screen (the kind that lets the image run all the way to the floor), the tough BlackStop™ enclosure, and the fittings to build your frame. And you're not left guessing on the pipe — Carl's tells you exactly what to grab, or you can make it dead simple with their Pipe Framing Kit for an all-in-one setup.

The Details

Picture walking into that spare room whenever you want and working on your swing — January, July, doesn't matter. This is what makes year-round golf at home actually doable.

To get the most out of it, pair the enclosure with a solid launch monitor. That's where the magic happens — you start seeing the real story behind every swing: ball flight, spin, ball speed, and more. Those numbers are what turn "hitting balls" into actually getting better.

Your Choice of Impact Screen

The screen material comes in four versions — Standard, Preferred, Premium, and the new High-Contrast Gray Premium. Every one of them is engineered with a bottomless edge, so you get that clean floor-to-turf image with minimal bounceback.

BlackStop™ Enclosure

The BlackStop™ surround wraps your simulator in a tough, light-shading surface — which does two things. It shades the screen so your image looks its brightest, and it catches the shots that miss or bounce back. Because nobody wants a wall full of golf-ball-sized dents.

Steel Fittings

The kit includes the corner fittings to connect your frame together. (Pipes sold separately — Carl's tells you exactly what you need.)

Zip Ties — and Yeah, We Thought of Tension

You get all the fasteners to secure the enclosure and screen, including zip ties to attach the screen to the frame. They even throw in extras so you can dial in the right tension for your swing. Depending on how close you hit to the screen, your ball speed, your clubs, and your spin, you can adjust it all to find that sweet spot between tension and slack. Little detail, big difference.

Made to Order — Built for Your Room

Here's the best part: these enclosures are made to order, sized to fit your space. Sounds like that'd take forever — it doesn't. Carl's does it well and does it fast, and you'll see your delivery date right in the cart before you buy.

Need a Custom Size?

Got an odd space? Screens and enclosures can be customized down to the inch, so you get a setup that fits your room exactly. 

FAQ

How far away should I stand from my impact screen?

For the safety of both the golfer and the screen, we recommend standing a minimum of 10-12 feet away from the screen.

Can I iron or steam a golf impact screen?

We do NOT recommend ironing your golf screen, simply because it is very easy to damage the screen. And we want your golf screen to last you a long, long time. With wrinkles and fold marks, the best thing is prevention. Unpack your new screen immediately, and if you need to store it, fold it very loosely. But if you're reading a section on ironing your golf screen, it's probably too late for prevention. Know that mounting your golf screen to a frame with tension, like with our zip ties or ball bungees, and letting it relax for a couple of days will smooth out most wrinkles.

That being said...

We have also had success using a steamer to help get wrinkles and folds out. Using a clean, consumer-grade steamer with distilled water will help accelerate the wrinkle removing process, and should avoid leaving water marks on your screen.

Can I wash my golf screen material?

Check out this article for all our recommendations on 'How to Clean Your Golf Impact Screen'.

Are there safety concerns when using a golf simulator?

We want your indoor golf set up to be fun, help improve your game, and be safe for everyone.

  • Make sure to follow the assembly manual provided with your enclosure.
  • Keep children, pets, and spectators out of swing range.
  • Protect ceilings, walls, windows, cars & neighboring homes.
  • Understand the Terms of Sale of using a Carl's Place product.

Do I need to use a golf hitting mat?

Golf hitting mats give you a nice cushy surface to stand and swing your golf club. They help protect your joints from any impact during your swing. They also let you have a more realistic golf practice when you can tee up the golf ball at the perfect height and swing freely.

When choosing a size for your golf mat consider the golfer's needs. A size of 4'x5' will let most golfers swing a driver with their heels comfortably on the edge of the mat. A larger size, 5'x7' or 4'x9', would be able to accommodate golfers with a wide stance or if you have friends over swinging either rightie or leftie.

Shop golf mats.


Golf Enclosure Information

What is the difference between Carl's Enclosure Kits?

Carl's DIY Golf Enclosure Kit offers you an easy, entry-level way to build a safe place to swing your clubs. An affordable, convenient kit, the DIY Enclosure Kit helps home golfers take the guesswork out of designing their own golf simulator.

Carl's Pro Golf Enclosure Kit is a higher-end enclosure for top-of-the-line performance in a golf simulator. Because it's available in wider, deeper bays with additional safety features it makes the best commercial golf simulator enclosure.

Carl's Curved Golf Enclosure Kit takes the Pro Enclosure’s sturdy design to the next level, adding a seamless curved screen for a truly immersive experience. Its unique structure surrounds the golfer, creating a lifelike, panoramic view that’s as impressive as it is functional.

Not sure which one is for you? Check out this article 'DIY vs. Pro' to help you decide.

How much space do I need for the enclosure?

When measuring for a golf simulator, make sure you take into account:

  • Buffer space: You don't want your golf simulator right up next to any walls or ceiling. Balls that contact the walls or ceiling can cause damage and have unwanted bounce back.
  • Footprint of the golf enclosure: Make sure to check the actual dimensions of the enclosure footprint. Our C-Series enclosures have built-in buffer space in the rear with the backset rear fitting.
  • Safe golfing distance away from the screen: For the safety of both the golfer and the screen, we recommend standing a minimum distance of 10 to 12 feet away from the screen.
  • Height of the golfer(s)
  • Length of the golf club(s)
  • Turf thickness, heating ducts, and soffits
  • Furniture and access to doorways
For complete guidelines on proper spacing for a golf simulator, check out our article 'Measuring Your Space for an Indoor Golf Simulator'.


When will my enclosure ship?

Our golf enclosure kits are made to order (which is why we can customize them down to the inch!). We make sure they are measured, sewn, and packed perfectly before they are ready to ship. Because of that, production lead time may fluctuate based on volume. To see the expected shipping and delivery times, please add the item to your cart and enter your shipping information.

What if the black enclosure material gets hit with a golf ball?

The enclosure material is not designed to take a direct hit from a golf ball. However, if you hit the white impact screen, and it bounces and hits the enclosure, you should not experience any issues.

Can I get a replacement screen for the enclosure?

We can easily make you a replacement screen to save you money. Replacement screens can be ordered by contacting one of our Customer Service Team Members. You can also call us at 608-352-0002. Learn more information about extending the life of your golf screen.

You can also check out our Clearance section to see if you can snag a deal on a replacement golf screen that fits your setup.

Installation

What pipes do I need to construct the enclosure kit frame?

Our DIY Golf Simulator Enclosures require 1-inch EMT (Electrical Metal Tubing/Conduit). We recommend you add a Pipe Framing Kit to your order so you get pre-cut, perfectly sized pipes for your enclosure frame. However, you can source EMT pipes on your own. Your kit will include all details on what lengths and quantities of pipes are required.

How long does it take to assemble the enclosure?

DIY Golf Simulator Enclosure Kits assemble in about an hour, depending on the size. Of course, it goes a bit faster if you have a helper. Here's our assembly video and manual for reference.

What are EMT pipes?

EMT stands for Electrical Metal Tubing, also known as, Electrical Metal Conduit. We often just refer to them as pipes on our website. You need EMT  (pipes) to build the frame for your enclosure/screen. Do not mistake PVC pipes for EMT. PVC will not work with our fittings. You have 2 options on how to get the necessary pipes:

  1. Add a Pipe Framing Kit. (You'll see these as accessories on our DIY and Pro Golf Enclosure Kits.
  2. Source EMT pipes at your local building supply store.
    • DIY Enclosures require 1″ EMT.
    • Pro and Curved Enclosures require 2" EMT which can be more difficult to find. Make sure you have a source for your EMT when selecting whether you want to add on our Pipe Framing Kit options.

Where and how should I mount my projector?

The projector specifications determine the maximum image size and how far from the screen it will need to be mounted. Check out our screen size calculator to find the best mounting location.

As for how to mount your projector, here are the places to put a golf simulator projector.

  1. Mount a projector above your tee or mat. 
    • Flush-mount to your ceiling in spaces with lower ceilings
    • Drop-mount from your ceiling in spaces with higher ceilings
    • Frame-mount from your Carl's Place Pro Enclosure
  2. Place a short-throw projector on the floor inside the golf simulator.  Of course, if you floor-mount your projector you must build or buy a protective cover to keep it safe from golf balls and clubs.

Read more here about projector mounting options.

Custom Options

Can you make a custom size golf simulator enclosure?

Yes! Head over to Build Your Own Golf Simulator where you can choose the size of enclosure and screen that fits your space. Please make sure to review our Returns Policy for custom products.

Resources

Assembly instructions and standard-size diagrams for the Carl's Place DIY C-Series golf simulator enclosure kit. Download them before you order so you can check the frame against your room.

Carl's Place DIY C-Series enclosure kit

Standard size diagrams

Tap a diagram to open it full size.

7.7x10x5 DIY enclosure

Carl's Place DIY C-Series enclosure diagram, 7.7x10x5 size

7.7x13x5 DIY enclosure

Carl's Place DIY C-Series enclosure diagram, 7.7x13x5 size

8.5x11.5x5 DIY enclosure

Carl's Place DIY C-Series enclosure diagram, 8.5x11.5x5 size

8x10.5x5 DIY enclosure

Carl's Place DIY C-Series enclosure diagram, 8x10.5x5 size

8x8x5 DIY enclosure

Carl's Place DIY C-Series enclosure diagram, 8x8x5 size

9x12x5 DIY enclosure

Carl's Place DIY C-Series enclosure diagram, 9x12x5 size

Ready to order, or not sure which size fits?

Shop Carl's Place enclosures or browse all enclosures & bays. If you're not sure which size fits, send me your ceiling height, width and depth or call or text (931) 278-5630.

Thanks for choosing Cornerstone Golf. I'm one person who loves this stuff and wants to help you do it right — whether you build it yourself or have me install it here in Middle Tennessee. Every product I carry is chosen because it works, and if you're ever unsure, just reach out. I'd rather help you find what fits than sell you what doesn't. Let's talk.